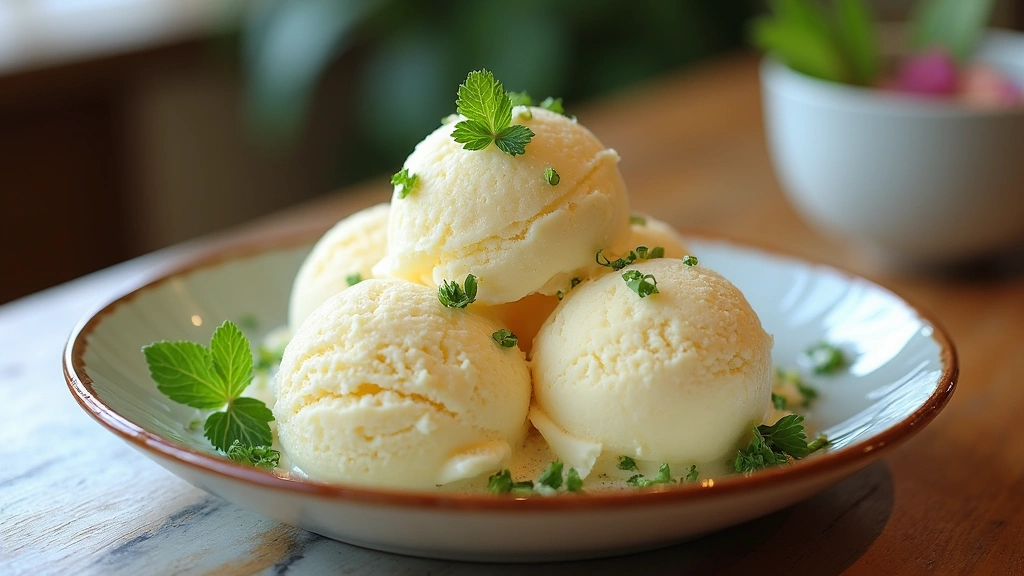
Keto Dairy Free Ice Cream is a heavenly treat that allows you to indulge without the guilt of traditional ice cream.
Rich, creamy, and fully customizable, this dessert caters perfectly to those following a low-carb or dairy-free lifestyle.
With flavors ranging from classic vanilla to decadent chocolate, each bite offers a delightful balance of sweetness and creaminess.
Whether you’re celebrating a special occasion or simply craving something sweet, this keto-friendly dessert promises satisfaction for everyone.
The History and Cultural Significance
• Keto Dairy Free Ice Cream Recipes trace their origins to the rise of the low-carb diet movement in the late 20th century, where health-conscious individuals sought alternatives to traditional desserts.
• The dish evolved over time as new low-carb sweeteners and dairy alternatives became available, allowing for a creamy and satisfying treat without the carbs.
• In modern health-conscious cultures, dairy-free ice cream is often enjoyed as a guilt-free dessert during summer gatherings and celebrations, symbolizing indulgence without compromise.
• While many variations exist across different dietary preferences, the authentic keto version maintains a rich texture and low sugar content that sets it apart from regular ice cream.
Recipe Overview
Nutritional Information (per serving)
Ingredients
Essential Equipment Guide
Ice Cream Maker: This tool is crucial for achieving the creamy texture of ice cream. Look for a model that has a built-in compressor or a pre-chilled bowl for optimal results. A good ice cream maker can significantly reduce churning time and improve the final texture.
Blender or Food Processor: A high-quality blender or food processor is essential for blending the ingredients into a smooth consistency. It should be powerful enough to handle frozen ingredients if you’re using them. This equipment helps to incorporate air into the mixture, enhancing the creaminess.
Mixing Bowls: Having a set of mixing bowls in various sizes is important for combining ingredients. Look for bowls that are easy to handle and preferably non-reactive, such as glass or stainless steel, to avoid altering the flavors of the ice cream.
Preparation Methods
Chilling the Base: Before making your ice cream, it’s crucial to chill your base mixture in the refrigerator for at least 30 minutes. This helps the flavors meld together and ensures a smoother texture when churning. Aim for a temperature below 40°F (4°C) to achieve optimal results.
Churning: This technique involves mixing the ice cream base in an ice cream maker. It’s essential to churn according to the manufacturer’s instructions, usually until it reaches a soft-serve consistency. This process incorporates air, making the final product light and fluffy.
Freezing: After churning, transferring the ice cream into an airtight container is important for proper freezing. Allow it to firm up in the freezer for at least 2 hours. This step solidifies the texture and enhances the flavors.
Step 1: Prepare the Base

In a large mixing bowl, combine the coconut milk and erythritol.
Whisk until the erythritol is fully dissolved and the mixture is smooth.
Add the vanilla extract and any optional flavorings like cocoa powder or almond butter.
Mix thoroughly to ensure an even distribution of flavors.
Step 2: Chill the Mixture

Cover the mixing bowl with plastic wrap or a lid.
Place it in the refrigerator for at least 30 minutes to chill.
This step is crucial for enhancing the flavors and achieving a creamy texture.
Check the mixture before churning to ensure it’s well chilled.
Step 3: Churn the Ice Cream

Pour the chilled mixture into your ice cream maker.
Follow the manufacturer’s instructions for churning time, usually around 20-30 minutes.
Look for a soft-serve consistency as the ice cream thickens.
This is the stage where air is incorporated, making the ice cream light and fluffy.
Step 4: Transfer to Container

Once the ice cream reaches a soft-serve consistency, use a spatula to transfer it into an airtight container.
Press down gently to remove any air pockets for a smoother texture.
Seal the container tightly to prevent freezer burn.
Label the container with the date for easy reference.
Step 5: Freeze the Ice Cream

Place the sealed container in the freezer.
Allow it to freeze for at least 2 hours to firm up.
Check the consistency after freezing; it should be scoopable but firm.
If it’s too hard, let it sit at room temperature for a few minutes before serving.
Step 6: Serve and Enjoy

Scoop the ice cream into bowls or cones using a warm ice cream scoop for easy serving.
Top with fresh berries, nuts, or a drizzle of sugar-free chocolate sauce if desired.
Serve immediately for the best texture and flavor experience.
Enjoy the satisfaction of a guilt-free treat that everyone will love.
Step 7: Store Leftovers Properly

If you have any ice cream leftover, make sure to seal it tightly in the container.
Return it to the freezer promptly to maintain its texture and flavor.
When ready to enjoy again, allow it to sit out for a few minutes before scooping.
This helps soften the ice cream for easier serving.
Critical Timing and Temperature Guide
Chilling the Base: Chill your mixture for at least 30 minutes. It should be below 40°F (4°C) before churning. Common mistakes include not chilling long enough, leading to poor texture.
Churning: Churn for 20-30 minutes until soft-serve consistency is achieved. Look for a thickened texture with visible air incorporation. Avoid over-churning, which can lead to ice crystals forming.
Freezing: Freeze for a minimum of 2 hours. The ice cream should be firm but scoopable. If too hard, allow to sit at room temperature for a few minutes before serving.
Pro Tips for Keto Dairy Free Ice Cream Recipes Low Carb And Creamy
• Ingredient Selection: Choose full-fat coconut milk for a richer texture and use erythritol for a sweetener that won’t affect blood sugar.
• Preparation Secret: Make sure all ingredients are cold before mixing to enhance the final texture.
• Temperature Management: Keep your ice cream maker bowl in the freezer for 24 hours before use for optimal churning results.
• Texture Enhancement: Incorporate a pinch of salt to balance sweetness and enhance flavor complexity.
• Flavor Layering: Add extracts gradually to find the perfect balance of flavors; taste as you go.
• Make-Ahead Strategies: Prepare the base a day in advance and store it in the fridge for easy assembly.
• Restaurant-Quality Finishing Touches: Garnish with fresh herbs or edible flowers for an elegant presentation.
• Equipment Optimization: Regularly clean your ice cream maker for efficient performance and longevity.
Troubleshooting Common Issues
• Texture Too Dense: This can occur if the mixture wasn’t chilled sufficiently before churning. Always chill your base adequately. If it happens, let the ice cream sit at room temperature for a few minutes before serving to soften it.
• Ice Crystals Forming: This happens when the ice cream is not mixed enough during churning. Ensure your ice cream maker is running long enough to incorporate air. If ice crystals form, blend the ice cream briefly in a food processor to smooth it out.
• Flavor Too Mild: This can be due to not using enough flavoring agents. Taste the base before freezing and adjust as needed. Adding a little extra sweetener can also enhance the overall flavor.
• Too Sweet: If the ice cream is overly sweet, you can balance it out with a pinch of salt or add unsweetened cocoa powder to mute the sweetness.
• Hard as a Rock: This can occur if the ice cream is frozen too long. Let it sit out for a few minutes before trying to scoop. For better storage, use an airtight container to minimize ice formation.
Variations and Regional Differences
• Chocolate Avocado Ice Cream: This version incorporates ripe avocados for added creaminess and a unique flavor. Blend avocados with cocoa powder and your sweetener for a smooth texture.
• Mint Chocolate Chip: Add peppermint extract and sugar-free chocolate chips to the base for a refreshing twist. This variation is perfect for summer gatherings.
• Berry Swirl: Create a berry sauce with fresh berries and a low-carb sweetener, then swirl it through the ice cream before freezing for a colorful presentation.
• Modern Interpretations: Many recipes now include superfoods like matcha or activated charcoal for trendy, health-conscious flavors that still remain keto-friendly.
Food Science Behind the Recipe
• Emulsification: The process of blending coconut milk and sweeteners creates an emulsion that ensures a creamy texture. Understanding emulsification helps achieve a smoother ice cream without ice crystals.
• Aeration: Churning the ice cream introduces air into the mixture, which is essential for creating a light and fluffy texture. The right amount of aeration can elevate the final product significantly.
• Freezing Point Depression: Low-carb sweeteners like erythritol lower the freezing point of the ice cream, preventing it from becoming too hard. This is a key concept to understand when creating frozen desserts.
Frequently Asked Questions
What’s the most common mistake people make when preparing Keto Dairy Free Ice Cream? The most common mistake is not chilling the mixture long enough before churning, which leads to a grainy texture. Always allow adequate chilling time.
Can I prepare components of this dish in advance? Yes, you can prepare the base a day ahead and store it in the refrigerator. Just ensure it’s well covered to avoid absorbing other flavors.
How do I adapt this recipe for dietary restrictions? You can substitute coconut milk with almond milk or cashew cream for nut allergies. Adjust sweeteners according to dietary needs as well.
What’s the best way to store and reheat leftovers? Store leftovers in an airtight container in the freezer. Let it sit out for 5-10 minutes before scooping to maintain texture.
Can I freeze this dish? Yes, this ice cream can be frozen for up to 2 weeks. For best results, ensure it’s in an airtight container to prevent freezer burn.
What wine or beverages pair best with this dish? Light wines like Moscato or fruity sparkling water complement the sweetness of the ice cream well.
How can I scale this recipe up for a crowd? Simply double or triple the ingredients, ensuring your ice cream maker can handle the increased volume for churning.
What side dishes complement this recipe best? Fresh fruit salad or nut-based cookies pair wonderfully with this ice cream, enhancing the overall dessert experience.
How do professional chefs elevate this dish for restaurant service? Chefs often use homemade sauces or garnishes, like berry coulis or candied nuts, to create a visually appealing and flavorful presentation.
Serving and Presentation Guide
• Traditional Presentation: Serve in chilled bowls with a scoop of ice cream topped with a sprig of mint or a dusting of cocoa powder. This brings a classic, elegant touch to your dessert.
• Modern Plating Ideas: Use a tall glass to layer the ice cream with fresh fruits or sauces, creating a visually striking dessert that showcases its creamy texture.
• Accompaniment Suggestions: Pair with a drizzle of sugar-free chocolate sauce or a sprinkle of crushed nuts for added texture and flavor.
• Special Occasion Presentation: For celebrations, consider adding edible flowers or a decorative chocolate shard on top for an upscale look that impresses guests.
Conclusion
I hope you enjoy making this delicious Keto Dairy Free Ice Cream at home.
It’s a wonderful way to indulge in a sweet treat without straying from your dietary goals.
With endless flavor possibilities, you can customize this recipe to suit your tastes perfectly.
So grab your ingredients and start creating your own creamy masterpiece today!