When it comes to party snacks, dips are always a crowd favorite.
These gluten-free, dairy-free dip recipes not only cater to dietary restrictions but also deliver bold flavors that everyone can enjoy.
I first experimented with these dips at a family gathering where we had guests with various food sensitivities.
The vibrant flavors and creamy textures made them a hit, proving that you don’t need gluten or dairy to create delicious party food.
The History and Cultural Significance
• Gluten Free Dairy Free Dip Recipes Perfect For Parties traces its origins to various global cuisines where dips have long been a staple.
• The dish evolved over decades as more people became aware of food allergies and intolerances, leading to innovative adaptations of traditional recipes.
• In Mediterranean cultures, dips like hummus and baba ghanoush are typically served during gatherings, symbolizing hospitality and sharing.
• While many variations exist across different regions, the authentic versions maintain a focus on fresh ingredients and bold flavors that set them apart from imitations.

Recipe Overview
Nutritional Information (per serving)


Ingredients


Essential Equipment Guide
Food Processor: This tool is essential for achieving a smooth and creamy dip consistency. A high-quality food processor can handle tougher ingredients like nuts and beans. Look for one with a powerful motor and multiple blade options for versatility.
Mixing Bowls: Having a variety of mixing bowls is important for preparing and combining ingredients efficiently. Glass or stainless steel bowls are ideal as they do not retain odors or stains. Choose different sizes to accommodate various mixing needs.
Measuring Cups and Spoons: Accurate measurements are crucial for flavor balance in your dips. Invest in a good set of measuring cups and spoons to ensure that you’re using the right amounts of each ingredient. Consider clear, easy-to-read markings for convenience.


Preparation Methods
Mashing Avocados: Mashing avocados is key for achieving the creamy base of your dip. Use a fork or a potato masher to break them down until smooth, but leave a few chunks for texture. Make sure to use ripe avocados for the best flavor and consistency.
Roasting Beets: Roasting beets enhances their natural sweetness and flavor. Wrap them in foil and roast at 400°F for about an hour until tender. Allow them to cool before peeling to make this process easier.
Dicing Vegetables: Dicing vegetables uniformly ensures even distribution in your dips. Use a sharp knife and a cutting board to create small, consistent pieces. This technique not only improves presentation but also enhances the texture of your dips.


Step 1: Prepare Avocados

Cut the avocados in half and remove the pits carefully.
Scoop the flesh into a mixing bowl.
Use a fork to mash the avocados until smooth, leaving some texture if desired.
Be sure to choose ripe avocados for the best flavor.
Step 2: Add Lime Juice

Squeeze the juice of one lime over the mashed avocados.
Make sure to avoid any seeds falling into the bowl.
The acidity of the lime helps prevent browning and adds brightness to the flavor.
Mix thoroughly to combine the lime juice with the avocado.
Step 3: Incorporate Garlic and Cumin

Add the minced garlic and cumin to the avocado mixture.
Stir well to ensure even distribution of flavors.
Taste the mixture to adjust seasoning according to your preference.
This step enhances the depth of flavor in the dip.


Step 4: Blend Beets for Hummus

Place cooked beets in a food processor with the chickpeas and tahini.
Blend until smooth, scraping down the sides as needed.
Adjust consistency by adding a tablespoon of water if necessary.
This process creates a vibrant, creamy beet hummus.
Step 5: Add Lemon Juice to Hummus

Pour in the lemon juice to the beet hummus mixture.
Blend again until fully incorporated.
Taste and adjust seasoning with salt or additional lemon juice if desired.
This adds a fresh tang that balances the earthiness of the beets.
Step 6: Prepare Spicy Salsa

In a mixing bowl, combine diced tomatoes, red onion, and minced jalapeño.
Stir the ingredients together to create a colorful salsa.
Add chopped cilantro and lime juice, mixing well.
This step adds a refreshing and zesty flavor profile.


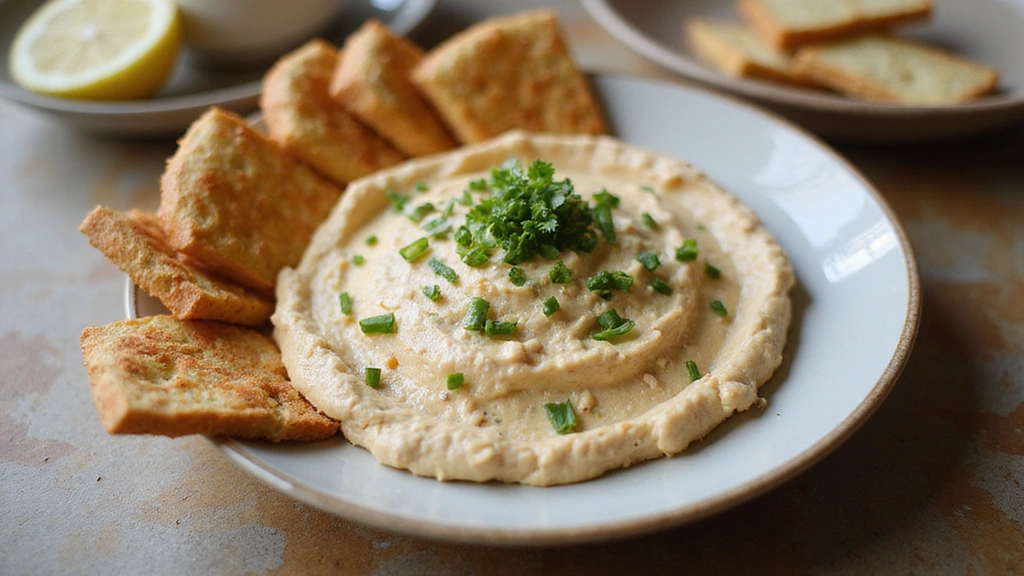
Step 7: Serve Dips with Accompaniments

Transfer each dip into a separate serving bowl.
Arrange an assortment of gluten-free crackers and fresh vegetables around the dips on a platter.
Garnish each dip with additional herbs for visual appeal.
This presentation invites guests to enjoy a variety of flavors.
Critical Timing and Temperature Guide
Mashing Avocados: Ensure the avocados are fully ripe by pressing gently; they should yield to slight pressure. Avoid over-mashing as it can turn the dip into a paste rather than a creamy texture. Monitor the time to prevent browning due to exposure to air.
Roasting Beets: Roast beets at 400°F for about 45-60 minutes until a fork easily pierces through. Check for doneness by inserting a fork or knife into the thickest part. Undercooked beets can result in a firm texture that’s not ideal for dips.
Serving Temperature: Serve dips at room temperature for the best flavor experience. If refrigerated, allow them to sit out for about 30 minutes before serving to enhance their flavors.
Pro Tips for Gluten Free Dairy Free Dip Recipes Perfect For Parties
• Ingredient Selection: Use the ripest avocados for a smoother dip and the freshest vegetables for salsa to enhance flavor.
• Preparation Secret: Chill the dips for an hour before serving; this allows the flavors to meld beautifully.
• Temperature Management: Keep dips at room temperature during the event to maintain optimal flavor and texture.
• Texture Enhancement: Consider adding a bit of olive oil to the hummus for a silkier texture.
• Flavor Layering: Experiment with spices like smoked paprika or cayenne for added depth.
• Make-Ahead Strategies: Prepare the dips a day in advance and store them in airtight containers to save time.
• Restaurant-Quality Finishing Touches: Drizzle olive oil over the dips before serving for a polished look.
• Equipment Optimization: Use a high-powered blender for the smoothest dips and avoid grainy textures.


Troubleshooting Common Issues
• Texture Too Dense: This can happen if you don’t add enough liquid while blending. If you notice the dip is too thick, incorporate a tablespoon of water or olive oil and blend again until smooth.
• Flavors Unbalanced: If a dip tastes bland, it may need more acid from lime or lemon juice. Add small increments of acid, tasting after each addition to achieve the right balance.
• Too Spicy: If the salsa is too spicy, add diced avocado or a bit of sugar to counteract the heat. This will help mellow out the flavors.
• Ingredients Not Blending Well: If the food processor struggles, stop and scrape down the sides before blending again. Ensure you’re using a powerful enough processor to handle dense ingredients.
• Dip Browning: To prevent guacamole from browning, keep it covered with plastic wrap directly on the surface or add more lime juice before refrigeration.
• Inconsistent Flavor: Always taste and adjust seasonings as you go; this ensures a well-balanced final product.
Variations and Regional Differences
• Mediterranean Variation: Incorporate feta cheese and olives into the hummus for a Mediterranean twist, adding briny flavors and creaminess.
• Mexican Variation: Add black beans and corn to the salsa for a heartier dip, bringing in sweet and savory elements.
• Asian-Inspired Variation: Replace tahini with sunflower seed butter in the hummus for a nut-free version with a unique flavor profile.
• Modern Interpretations: Experiment with plant-based yogurt or alternative cream cheese in dips for a contemporary and creamy texture.


Food Science Behind the Recipe
• Emulsification: The process of combining fats and liquids smoothly, essential for creamy dips. Understanding emulsification helps in achieving the right texture, especially in hummus and avocado dips.
• Oxidation: This process causes avocados to brown when exposed to air. Adding lime juice slows oxidation, preserving the vibrant green color and fresh flavor of guacamole.
• Flavor Development: Allowing dips to rest before serving helps develop their flavors as ingredients meld together, enhancing the overall taste experience.
Frequently Asked Questions
What’s the most common mistake people make when preparing dips? Not tasting and adjusting seasonings throughout the process can lead to an unbalanced dip. Always taste as you go to ensure great flavor.
Can I prepare components of this dish in advance? Yes! You can prepare the dips a day ahead and store them in airtight containers in the fridge. Just bring them to room temperature before serving.
How do I adapt this recipe for dietary restrictions? Substituting chickpeas with cooked lentils creates a great alternative for those with legume allergies. Adjust other ingredients as needed.
What’s the best way to store and reheat leftovers? Store leftovers in airtight containers in the refrigerator for up to three days. Reheat gently in the microwave, again stirring to ensure even heating.
Can I freeze this dish? Yes, the beet hummus can be frozen for up to three months. Thaw overnight in the fridge and stir well before serving.
What wine or beverages pair best with this dish? Light white wines like Sauvignon Blanc complement the fresh flavors of the dips nicely.
How can I scale this recipe up for a crowd? Simply multiply the ingredients by the number of servings desired, and consider using larger mixing bowls or multiple food processors for efficiency.
What side dishes complement this recipe best? Serve with gluten-free pita chips or fresh veggie sticks for a perfect pairing.
How do professional chefs elevate this dish for restaurant service? They often use fresh herbs for garnishing and serve the dips in stylish, individual portions for a sophisticated touch.
Serving and Presentation Guide
• Traditional Presentation: Serve dips in small, rustic bowls surrounded by an assortment of fresh vegetables and gluten-free crackers for a casual yet inviting look.
• Modern Plating Ideas: Use sleek, white dishes for a contemporary feel, arranging each dip in a line with colorful garnishes for visual appeal.
• Accompaniment Suggestions: Pair dips with crunchy vegetable sticks like carrots, cucumbers, and bell peppers to enhance texture.
• Special Occasion Presentation: For festive gatherings, serve dips in decorative bowls and add edible flowers or herbs as garnishes for an elegant touch.
Conclusion
These gluten-free, dairy-free dips are sure to be a hit at your next gathering.
Not only are they easy to prepare, but they also cater to a variety of dietary needs without compromising on flavor.
I encourage you to try these recipes and experiment with your own twists!
Enjoy the compliments from your guests as they indulge in these delicious creations.